Introduction to Responsive Web Design in WebSphere Portal

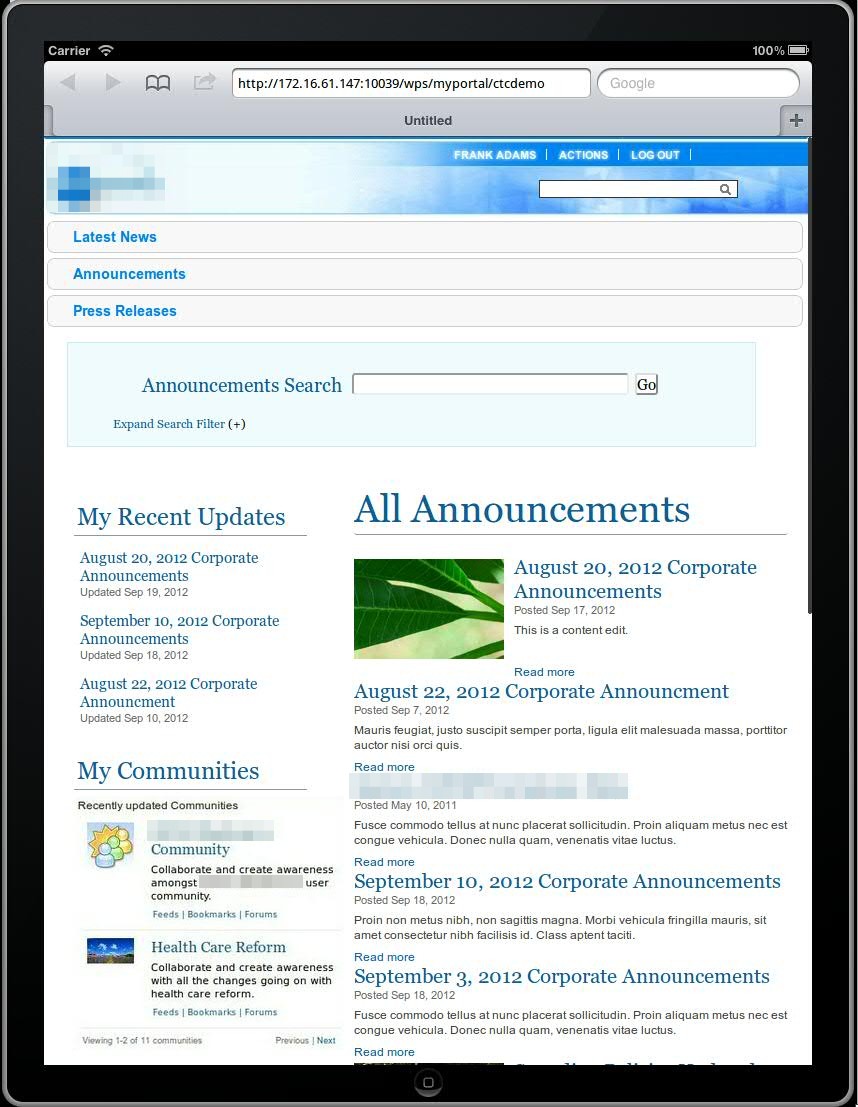
As a Technical Sales Specialist focusing on IBM’s Digital Experience portfolio, I often do WebSphere Portal and WCM demos.  With all the interest in mobility, mobile capabilities are one of the key features I love to demo!  Until recently, I would typically demo the Mobile Experience or mobile theme capabilities while showing a portlet or two, perhaps containing WCM content tailored for mobile device viewing. The introduction of responsive theme support in the latest version(s) of WebSphere Portal has made the mobile capabilities that much easier to demo while it also tends to get the audience engaged in the demo (at least in my experiences).  That’s not to say I no longer demo the Mobile Experience, but I now like the ability to demo both the Mobile Experience as well as the responsive design to show the breadth of capabilities (and the latest announcement of Worklight integration capabilties will only make this story that much better). When it was initially released for Portal v7, I used a demo based on the fictitious “Lotus Company” Portal, but the responsive theme could not be applied to just any Portal instance. Since the release of Portal v8, there is a beta release release of the (CTC) responsive theme that is said to be a part of the next release of the Content Template Catalog (v4). The flexibility of this (beta) release of the responsive design theme has been great in that it can be applied to the latest release of the CTC and then customized as I typically do for Portal and WCM demos. The customization that I usually do for a demo involves creating a new “style” (a single CSS file I use to override the standard Portal style classes) for the theme, add that style to the styles.json file in theme, and then apply that “style”. I’ve also had to make changes to one of the standard responsive theme CSS files (theme.css) in order for the media queries (the basis of how responsive design works) to be triggered on an orientation change of the iPad, which I typically use to demo mobile capabilities. I’ve also played around with some of CSS classes in the theme.css so that some of the page and column layouts display a little a bit better.  Feel free to reach out with questions around the details of any of the changes I’ve had to make.  In the meantime, here’s a quick look at a Portal instance with the beta responsive design theme and a couple of different styles I created for recent demos…

Landscape Orientation Portrait Orientation
(Notice the change to the navigation and page layout)

Introduction to the WebSphere Portal Solution Installer

The introduction of the Solution Installer has been an excellent addition to the WebSphere Portal product.  Having worked with Portal for years, a comprehensive deployment tool for all of the various Portal resources and assets has always been lacking to put it nicely.  After recently developing a polling widget for Portal / WCM, I figured the best way to make it reusable for colleagues was to make it easily deployable, especially considering there are many different Portal resources involved in deployment of the asset (e.g. .war, WCM library, user, access control, etc.).  I decided to dive in and create my first Portal Application Archive (or PAA).  I’ll by no means claim to be an expert, but at least getting started was relatively painless.  I downloaded and installed the Solution Installer and along with it, is documentation on how to create and use the Solution Installer.  Because I never find reading documentation to be the easiest way to learn something new, I also downloaded an existing PAA asset (a lot of the Portal Solution Catalog assets (here) are now packaged as a .paa) and extracted it to “see” what a .paa actually looks like. At the root of the .paa file is the configuration XML file (sdd.xml) and documentation and components folders.  You can store any documentation relating to your PAA within the documentation folder and the components folder is the root folder in which all of your various Portal resources to deploy will be contained, we’ll talk about that further in a second.  Let’s start with the configuration XML file, or sdd.xml. I started with an existing sdd.xml from the PAA that I extracted and the key elements to be concerned with are the PAA name, version, displayName and then the containedPackage element, which contains the path within the PAA to another XML configuration file which automatically gets generated during the deployment process (also named sdd.xml). The XML configuration file that gets generated is done so based on the contents of the subdirectories of the components folder and is used by the PAA installation process to determine what needs to be executed. Under the components folder will be a folder given the name of the PAA (in my case, polling) which contains subdirectories for each of the various Portal resource types. In my case, I had two subdirectories, content and installableApps and the content subdirectory also contains two subdirectories, xmlaccess for XML access-based resources and wcm for WCM-based resources. Within each subdirectory, you can simply drop the associated resource(s), for example, .xml files within the xmlaccess subdirectory. You may also notice an order.properties file within each subdirectory so that you can tell the Solution Installer in which order you would like your resources deployed. The installableApps directory contains any deployable enterprise (.ears) and/or web applications (.wars) that are to be installed or updated, in my case, the Polling widget / portlet .war. Again, the Solution Installer does include documentation which I’ll admit is actually pretty good.  I would definitely recommend downloading and following this, but I also wanted to document my experience and perhaps give a primer on the Solution Installer. There is MUCH more to the Solution Installer than I’ve mentioned here, such as the ability to install and update other Portal resource types as well as the ability to write custom scripts, here is a link to a white paper / user guide for the solution installer. As always, feel free to reach out with any questions!

Deploying a custom iWidget to IBM Connections

Assuming you have IBM Connections deployed and a custom iWidget developed (in this example, using Web Experience Factory), this blog entry documents how to deploy the iWidget(s) to the IBM Connections server and make it accessible via IBM Connections Home pages and/or Communities/Profiles services:

  1. Export the iWidget(s) from Web Experience Factory by right-clicking on the widget project and choosing the “Export >  WebSphere Portlet Factory Widget WAR” option.
  2. Deploy this .war file using the IBM Connection administrative console, using the default options, and associating it with the Connections server (profile) and web server, while making note of the context root.
    • Note:  After deploying the widget .war file, I had to re-generate and propogate the web server plug-in through the WAS admin console in order for the widget context-root to be recognized by the web server.
  3. Once deployed, start the iWidget application again using the administrative console.
  1. To verify that the iWidget was deployed correctly, try accessing it given the following url:http://&lt;Connections Server Name>/<context-root>/<iWidget URI>, where:
    • Connections Server Name – host name of the Connections server
    • context-root – Context root noted during iWidget application deployment
    • iWidget URI – can be found in the catalog.xml file of the iWidget .war file’s /WEB-INF directory, specifically, the <definition> element

The result of invoking this URL should be iWidget markup displayed in the browser.

  1. To deploy the iWidget to IBM Connections:
  • To IBM Connections Home page:
    • Login as an IBM Connection Administrator
    • Go to the Administration tab, and under “Disabled widgets”, click the “Add another widget”
    • Add the Widget Title as appropriate
    • Set the URL Address to the URL as noted above while testing to see if the iWidget was deployed correctly
    • Set the Secure URL Address, Icon URL, and Icon Secure URL, and any of the other check boxes provided as necessary
    • Save the widget configuration, and once back on the Administrative screen, click the new widget, and choose “Enable”
    • The widget should now should show up on the Updates and Widgets Home pages when you click Customize.
  • To IBM Connections Profiles / Communities:
    • Deploying a custom widget to the Profiles and/or Communities is done through WebSphere Administration (wsadmin)
    • The following IBM Connections wiki URL describes how to deploy a custom widget to Communities using the wsadmin tooling (http://www-10.lotus.com/ldd/lcwiki.nsf/dx/Using_the_widgetsconfig.xml_file_for_Communities_ic301)
      • First, start the wsadmin client (the URL contains a link which gives the command for starting the wsadmin client)
      • Next, check-out the widgets-config.xml file which contains all widget configurations for Communities
      • Once checked out, add the necessary configuration for the custom widget to be added. I found it useful to copy and existing widget configuration and use that as a starting point.
      • Once updated, check-in the widgets-config.xml using the appropriate wsadmin command, and exit the wsadmin client
      • Finally, restart the Communities enterprise application using the Connection WebSphere Administrative console.
    • Once configured, the custom widget will now show up in the Communities pallete when customizing a Community. Though I didn’t configure the custom widget to show up under the Profiles service, I would assume it’s a very similar process to the Communities service widget configuration.

I’ve also created a sample .war file containing the widget, please feel free to contact me for this asset. It’s a pretty basic widget that displays a question with a list of answers and displays the results in a separate (Dojo) accordian panel, I’ve included a couple of screen shots below:

potd-poll potd-results

Enabling VMware 64-bit guest OS support on a 32-bit host OS

I recently ran into the situation in which I needed to start a VMware 64-bit guest OS in which I’m running a 32-bit version of Ubuntu (10.10).  After a bit of research, depending on your computer’s processor, you can go into the BIOS and enable the CPU’s “VT” BIOS setting (BIOS > Config > CPU > Intel© Virtual Technology > Enable), which is Disabled by default.  Luckily I have a Lenovo W510 with a Intel Core i7 processor that supports the ability to run a 64-bit guest OS upon a 32-bit host, and all that it took was changing this BIOS setting.  There’s also a utility VMware provides that allows you to check your processor for 64-bit guest OS compatibility:

http://downloads.vmware.com/d/details/processor_check_5_5_dt/dCpiQGhkYmRAZQ==